Creating a Professional Directory Website with WordPress: A Step-by-Step Guide
Building a directory website might sound daunting, but with WordPress, the process is straightforward and accessible—even for those without advanced technical skills. Whether you’re planning a local business directory, a niche service listing, or a community resource hub, this guide walks you through the entire process, from start to finish, in a way that’s easy to follow and implement.
Why Use WordPress for a Directory Website?
Before diving into the how, it’s important to understand the why. WordPress powers over 40% of all websites globally, and for good reason:
-
User-Friendly Interface
WordPress is renowned for its intuitive dashboard, making it simple to manage content, customize designs, and add functionality without coding.
-
Flexibility
Thousands of themes and plugins allow you to tailor your directory to match niche requirements, whether you’re listing restaurants, freelancers, or real estate properties.
-
SEO-Ready Structure
WordPress is built with clean code, and plugins like Yoast SEO make it easy to optimize your site for search engines, ensuring your directory gains visibility.
- Scalability
As your directory grows, WordPress scales with you. Add new categories, listings, or even monetization features without rebuilding the site from scratch.
Step 1: Define Your Directory’s Purpose & Audience
A successful directory starts with clarity. Ask yourself:
- What niche or industry will the directory serve?
Focus on specificity. For example, “vegan restaurants in New York” performs better than a generic “restaurant directory.”
- Who is your target audience?
Define user demographics and what they need from your directory (e.g., location filters, price ranges, reviews).
- What features are essential?
Advanced search filters, user submissions, membership tiers, or a map integration? List these upfront.
This groundwork ensures your directory solves a real problem and stands out in a crowded market.
Step 2: Choose a Domain Name and Hosting Provider
Your domain and hosting form the foundation of your website.
- Domain Name
Keep it short, memorable, and keyword-rich (e.g., NYCVeganEats.com). Avoid hyphens or complex spellings.
- Web Hosting
Opt for a provider specializing in WordPress, such as SiteGround, Bluehost, or WP Engine. These offer one-click WordPress installations, SSL certificates, and 24/7 support.
Pro Tip:
Start with shared hosting to save costs. Upgrade to a dedicated server later if traffic surges.
Step 3: Install WordPress and Configure Basic Settings
Most hosting providers include a one-click WordPress installer:
- Log into your hosting account and navigate to the control panel.
- Select “Install WordPress” and follow the prompts.
- Set up your admin username, password, and email.
After installation, tweak these settings for better performance:
- Permalinks: Go to Settings > Permalinks, and choose “Post Name” for SEO-friendly URLs.
- Timezone
- Site Title & Tagline
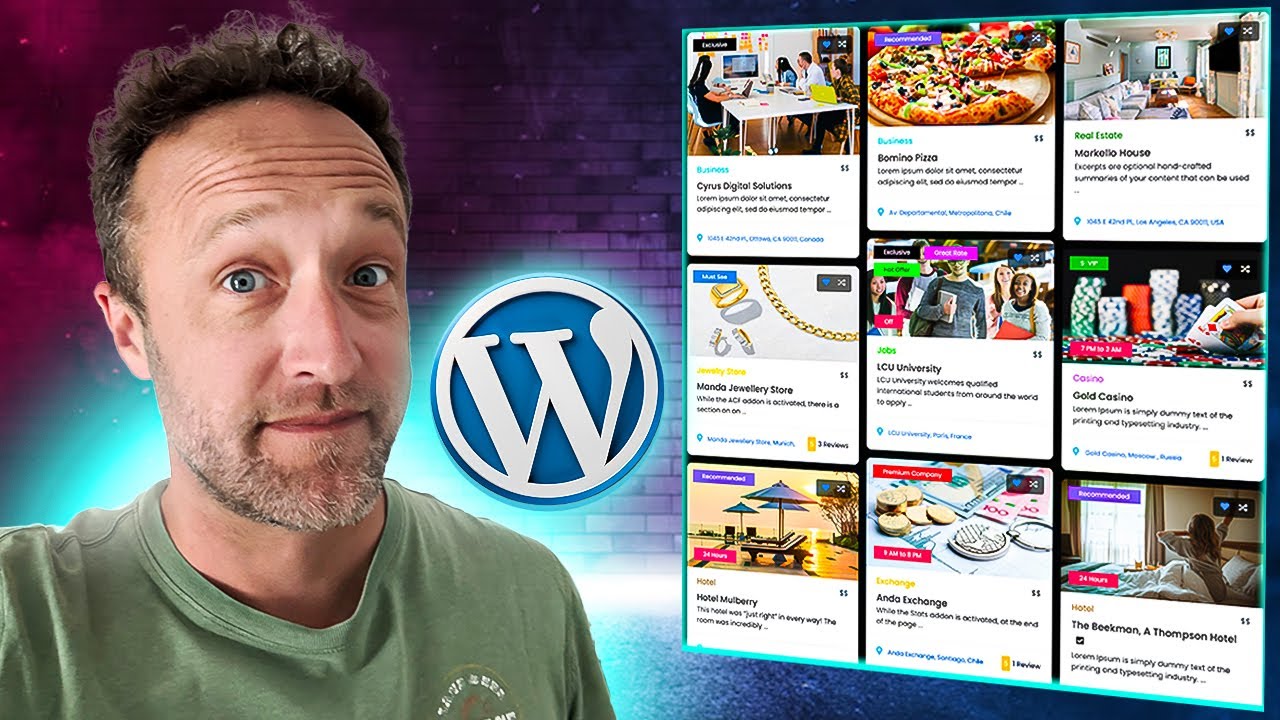
Step 4: Select a Directory-Focused WordPress Theme
Your theme determines your site’s layout, user experience, and mobile responsiveness. Look for themes designed specifically for directories:
- Directory-Specific Themes
Themes like Listable, Directoria, or GeoDirectory include built-in listing templates, maps, and submission forms.
- Multipurpose Themes
Divi or Astra paired with a directory plugin offer flexibility but may require more setup.
Key Features to Prioritize:
- Mobile responsiveness
- Customizable listing layouts
- Integration with directory plugins
Step 5: Install a Directory Plugin
Plugins add functionality without coding. For directories, these two options stand out:
- Business Directory Plugin
A free, lightweight solution for basic directories. Supports categories, search, and user submissions.
- GeoDirectory
A premium plugin with advanced tools like front-end submissions, customizable fields, and monetization options.
Configuration Tips:
- Create custom fields for relevant data (e.g., phone numbers, opening hours).
- Enable user registration if you want members to manage their listings.
- Set up a moderation system to approve submissions manually.
Step 6: Populate Your Directory with Listings
Avoid launching an empty directory. Seed it with at least 10–20 high-quality listings to attract users:
- Manual Entries
Add listings yourself with detailed descriptions, images, and contact info.
- Import Bulk Data
Use CSV importers (available in plugins like GeoDirectory) to upload multiple listings at once.
- Encourage Early Submissions
Offer free listings in exchange for testimonials or feedback during the launch phase.
Optimize Listings for SEO:
- Include keywords in titles and descriptions (e.g., “Best Vegan Bakery in Brooklyn”).
- Compress images to improve load times.
- Add schema markup using plugins like Schema Pro for rich snippets in search results.
Step 7: Enhance User Experience with Key Features
A functional directory isn’t enough—users expect intuitive navigation and valuable tools. Implement these features:
- Advanced Search Filters
Let users filter by location, price, ratings, or amenities.
- Interactive Maps
Embed Google Maps to visualize listings geographically.
- Ratings & Reviews
Plugins like WP Customer Reviews build trust and encourage engagement.
- Membership Tiers
Offer premium listings, featured placements, or ad-free browsing for recurring revenue.
Step 8: Optimize for SEO and Performance
Drive organic traffic by fine-tuning your SEO strategy:
- Keyword Research
Use tools like Ahrefs or Ubersuggest to find low-competition keywords (e.g., “dog walkers near me” instead of “pet services”).
- On-Page SEO
Optimize meta titles, descriptions, headers (H1, H2), and image alt text.
- Speed Optimization
Use a caching plugin (WP Rocket) and compress images (ShortPixel).
- Mobile-First Design
Ensure your directory looks and functions perfectly on smartphones.
Step 9: Monetize Your Directory
Turn your directory into a revenue stream with these models:
- Paid Listings
Charge businesses for standard or premium listings (with plugins like WooCommerce integration).
- Featured Placements
Highlight certain listings at the top of search results for a fee.
- Advertisements
Sell banner ad space to businesses in your niche.
Pro Tip:
Start with a freemium model to build traction, then introduce paid features once you have an active user base.
Step 10: Launch and Promote Your Directory
A strategic launch ensures your directory gains momentum:
- Soft Launch
Share the site with a small group for feedback. Fix bugs and refine用户体验.
- Content Marketing
Write blog posts about your niche (e.g., “Top 10 Vegan Restaurants in NYC”) to attract organic traffic.
- Email Outreach
Partner with businesses listed in your directory to cross-promote.
- Local SEO
Register your directory on Google My Business and other local directories.
Maintaining and Scaling Your Directory
After launching, focus on long-term growth:
- Regular Updates
Refresh listings, add new categories, and keep plugins/themes updated.
- User Feedback
Survey users to identify gaps or desired features.
- Analytics
Use Google Analytics to track traffic, popular listings, and user behavior.
Final Thoughts
Creating a directory website with WordPress is a manageable project that combines strategic planning with the right tools. By following this guide, you’ll build a functional, user-friendly directory that serves your audience and grows into a sustainable online resource. Remember: Consistency is key. Regular updates, SEO maintenance, and engagement with your community will ensure your directory thrives in the long run. Happy building!